


#Full disclosure this blog does have a bit of "Product placement" in it with an open-source package I wrote. Other than that this is one way to implement client-side GA4 analytics.#
Why add google analytics to a web App?
Error tracking and analytics
Discover what works and what doesn't
Discover website usage patterns to better inform feature development or refactors
Understand the cost of features against how often they are used
Justify further spending on new features
For anything that you want to measure, you can use google analytics for this.
Add google analytics to a web App?
Let's start by adding a way for collecting data to our website, and then deciding which data we want to capture. In this scenario, we are interested to know who is clicking on the register button and who is clicking the signing in button.
First, we will install a dependency #react-marketing-tools(RMT) this will provide us with a way to capture data and send it to GA4 via our GTM. Also for convenience, I recommend using this dependency react-gtm-module for adding GTM and the 👍dataLayer to your project, or you could do it manually if you prefer.
React Marketing Tools Demo
This is an example of a very simple implementation, some of this we will breakdown and explain further, just continue reading 🙃
The above demo implementation doesn't use a react Context/Provider so you have the option of using this package outside of react.
By clicking register or login and then showing dataLayer you can see the key/values that go to your GA4 analytics.
To view the Context/Provider implementation checkout the example in the
GitHub repo README.md.
React Marketing Tools global config
const TOKENS = { // all TOKENS are optional
  /*
    If withServerLocationInfo is true you must supply IP_INFO_TOKEN token.
  */
  IP_INFO_TOKEN: 'SOME_TOKEN',
  /*
    If analyticsType = analyticsPlatform.GOOGLE the below tokens must be supplied.
  */
  GA4_PUBLIC_API_SECRET: 'SOME_TOKEN',
  GA4_PUBLIC_MEASUREMENT_ID: 'SOME_TOKEN',
}

const analyticsConfig = {
  appName: "my-awesome-app",
  appSessionCookieName: "AWESOME_APP",
  eventActionPrefix: {},
  globalEventActionList: {
    // this will extend the default values of globalEventActionList
    LOGIN: "LOGIN",
    REGISTER: "REGISTER",
    UNAUTHENTICATED: "UNAUTHENTICATED",
    AUTHENTICATED: "AUTHENTICATED"
  },
/*
   * If you dont add the user data keys to this includeUserKeys
   * the values will be adde to the journeyProps not the userProps
*/
  includeUserKeys: ["email"],
/*
   * showMissingUserAttributesInConsole if true will console.log in the browser console user data that does not match the includeUserKeys array
*/
  showMissingUserAttributesInConsole: false,
  TOKENS,
  withDeviceInfo: true,
  withServerLocationInfo: false
};
Note: withDeviceInfo, withServerLocationInfo use the following dependencies to get the respective data. These are great tools for making your life much easier!
withDeviceInfo- device-detector-jswithServerLocationInfo- https://ipinfo.io
React Marketing Tools event config
      const eventNameInfo = {
/*
   * eventName is optional and will be change to "REGISTER_ACCOUNT"
   * this is the event name you will add to your Tag in GTM
   * If this is not passed in the event name will be a combination of actionPrefix & globalAppEvent e.g. I_REGISTER
*/
        eventName: 'register account',
/*
   * actionPrefix this will be added to the eventName
   * this helps to quickly identify the type of action in GTM & GA4
   * "I_REGISTER_ACCOUNT"
*/
        actionPrefix: "I", // INTERACTION | J: JOURNEY
/*
   * globalAppEvent here the key/values added to "globalEventActionList" are used
*/
        globalAppEvent: "REGISTER",
/*
   * previousGlobalAppEvent this is helpful for building user journeys         with the data,
   * It is not always available or needed therefore it is optional
*/
        previousGlobalAppEvent: "UNAUTHENTICATED"
      };
Google Tag Manager
Now we set up our GTM with all the events, triggers and variables we want to collect.
There are any number of ways you can set up your GTM. I will show you a way that I prefer, it helps me manage a dev & prod environment that way I don't pollute my prod data with any testing or dev data.
Below is a snapshot of things we will cover in this section and some of the terms that will be used.
Versions/Workspace
Live, Latest (aka production)
dev
Tags
Triggers
Variables & Folders
So first sign up to GTM with the Google account you want to use to manage GTM. Once we have signed in to GTM we will have access to the values below.
id: string, // GTM-ABC....
gtm_auth: string, // Qr08F...
preview: string, // env-1 - This value is what we use to define which environment we are using.
If you don't see these right away you can find them under Admin > Install Google Tag Manager This is also where you will find the code needed to manually add GTM/dataLayer to your App if you do not want to use react-gtm-module.
Add TagManager
Now we have these values we can add GTM and the dataLayer to our website with react-gtm-module.
import TagManager from 'react-gtm-module'

// Usually these values can be added to your .env
const tagManagerArgs = {
   gtmId: "GTM-ABC",
   dataLayerName: "dataLayer",
   auth: "Qr08F...",
   preview: "env-1"
};

useEffect(function initiateGoogleTagManager() {
  TagManager.initialize(tagManagerArgs);
}, []);
If you have set up your data collection with #react-marketing-tools(RMT) and you have completed the above initialisation of GTM, at this point you will be able to see the data in your dataLayer in the console.
Either use the built-in logging from RMT or just open the console type dataLayer and hit enter you will see something like this.
At this point, I recommend taking a little time to understand the parts of this
dataLayerand understand where most of the data comes from.TLDR; It is a combination of the
analyticsConfigyou passed to thebuildConfigfrom RMT, also what you added to each event data objecttrackingData, in this case, the events of Register and Login.
Check-out thehandleButtonClickfrom the above demo.NOTE:
All
journeyPropsvariables will be CAPITALISED. This point is important to remember when we come to assign thedataLayervalues to new GTM variables.At this point none of the data that is in the
dataLayeris going to go to GA4 via GTM because we have not configured GTM yet.
Google Tag Manager Setup
We are going to start from the bottom up to setup our GTM.
Variables & Folders
Triggers
Tags
Variables ✅
We are setting up the variables based on what you might use with RMT, but this setup can be used for any implementation of GTM. The variables will be added to your Tags.
Built-In Variables
Name | Type |
Event | Custom Event |
Page Hostname | URL |
Page Path | URL |
Page URL | URL |
Referrer | HTTP Referrer |
User-Defined Variables
"constant" variables in this case are used as a fallback to convert any other user-defined values to an acceptable type. This is a "helper variable" in case the parsing of the data to a JSON object ever fails.
I decided to use these "helper variables" because it can take a lot of time to figure out why a variable is not appearing in the payload for GA4, at least with this fallback I can see the variable, and I can see it has no value "" or a "boolean" value and work directly on fixing it.
Name | Type | Folder | Value |
empty_string | Constant | common | "" |
false_string_boolean | Constant | common | "false" |
true_string_boolean | Constant | common | "true" |
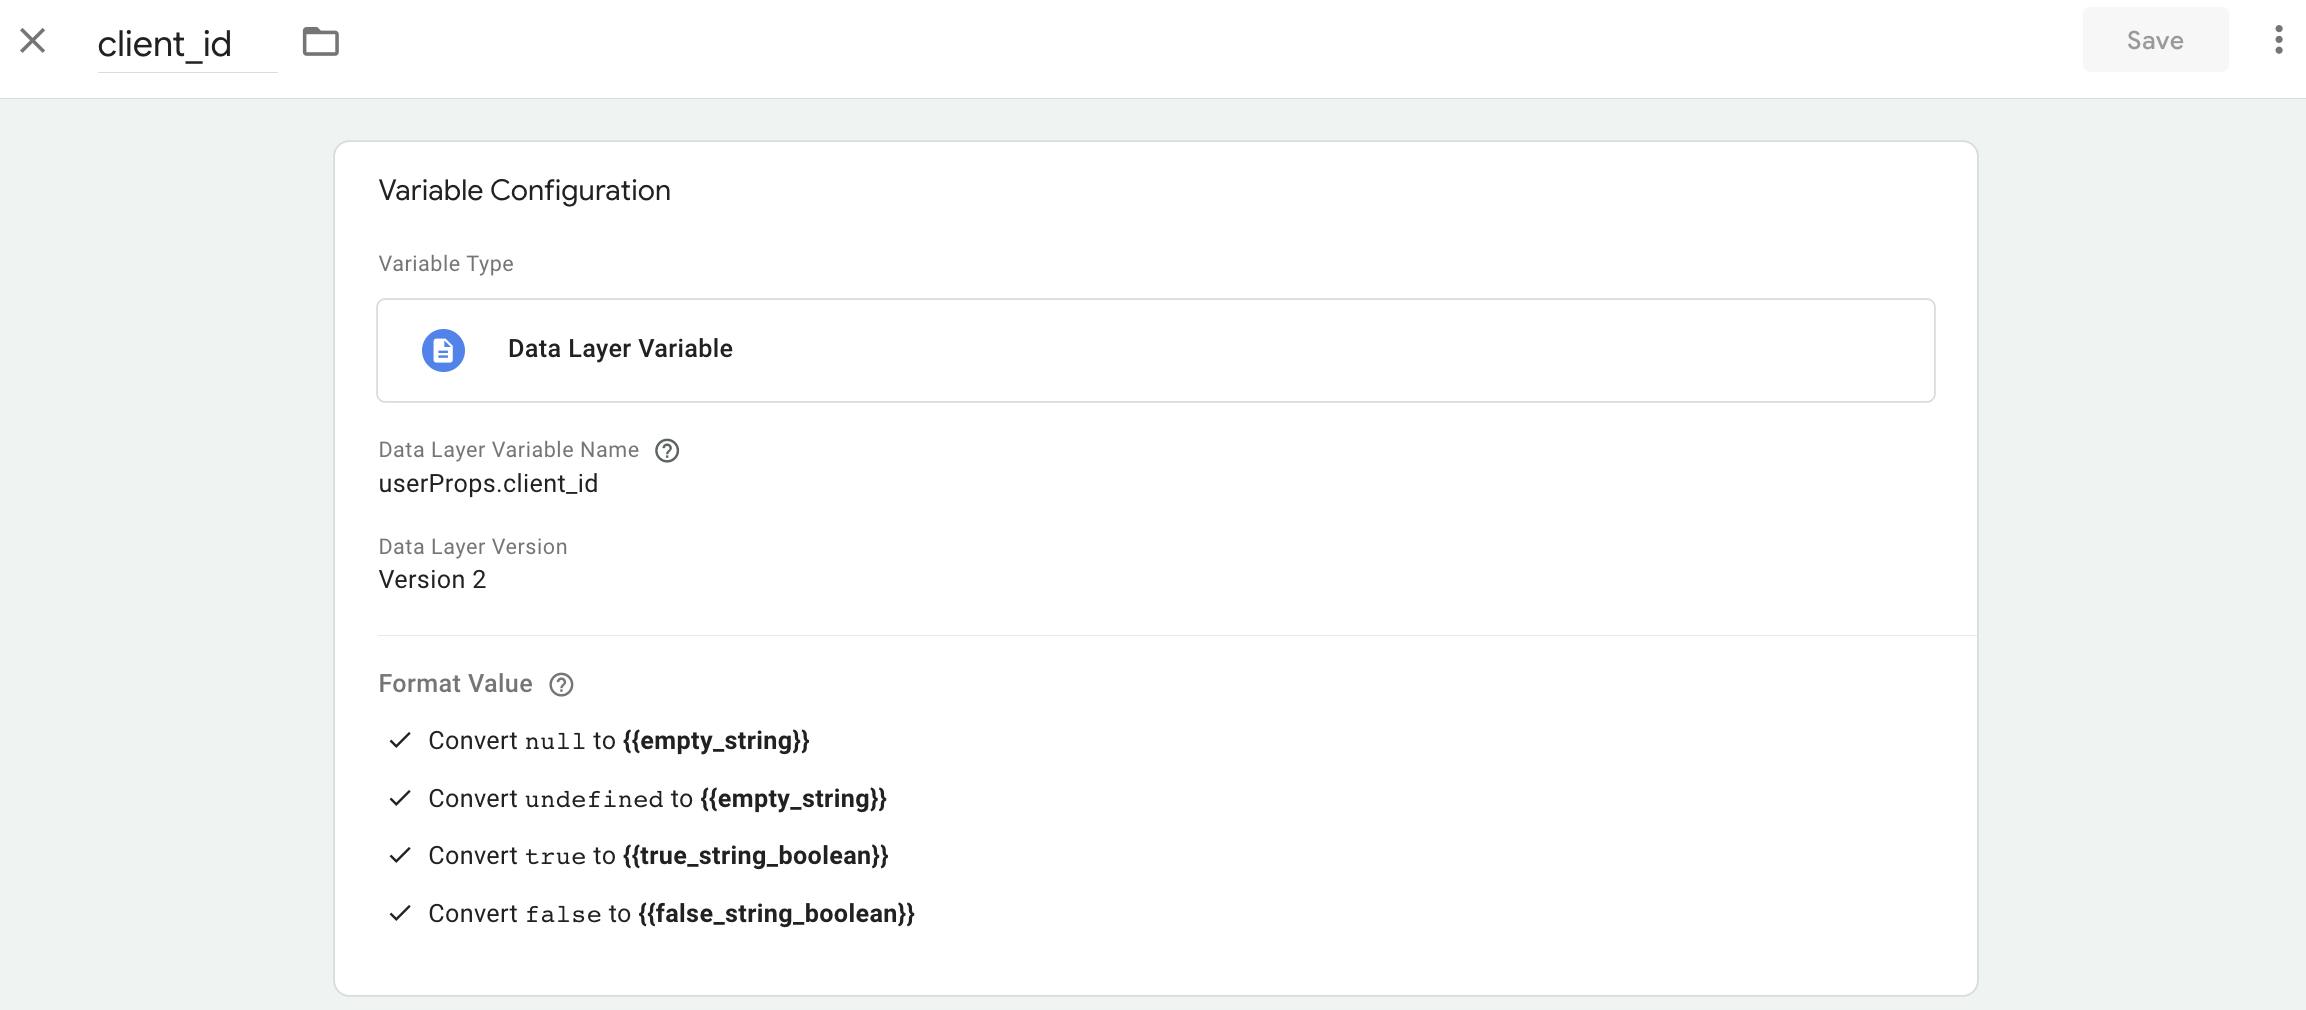
client_id | Data Layer Variable | userProps |
|
Data Layer Variable | userProps | event | |
app | Data Layer Variable | globalVars |
|
DEVICE_BROWSER | Data Layer Variable | globalVars | RMT feat |
DEVICE_CATEGORY | Data Layer Variable | globalVars | RMT feat |
DEVICE_OS | Data Layer Variable | globalVars | RMT feat |
HIT_TIMESTAMP | Data Layer Variable | journeyProps | toISOString() |
SERVER_CITY | Data Layer Variable | journeyProps | RMT feat |
SERVER_COUNTRY | Data Layer Variable | journeyProps | RMT feat |
SERVER_HOSTNAME | Data Layer Variable | journeyProps | RMT feat |
SERVER_IP | Data Layer Variable | journeyProps | RMT feat |
SERVER_LOCATION | Data Layer Variable | journeyProps | RMT feat |
SERVER_POSTAL | Data Layer Variable | journeyProps | RMT feat |
SERVER_REGION | Data Layer Variable | journeyProps | RMT feat |
SERVER_TIMEZONE | Data Layer Variable | journeyProps | RMT feat |
Example: You can see below we take the value from the dataLayer by assigning userProps.client_id to the GTM client_id variable.
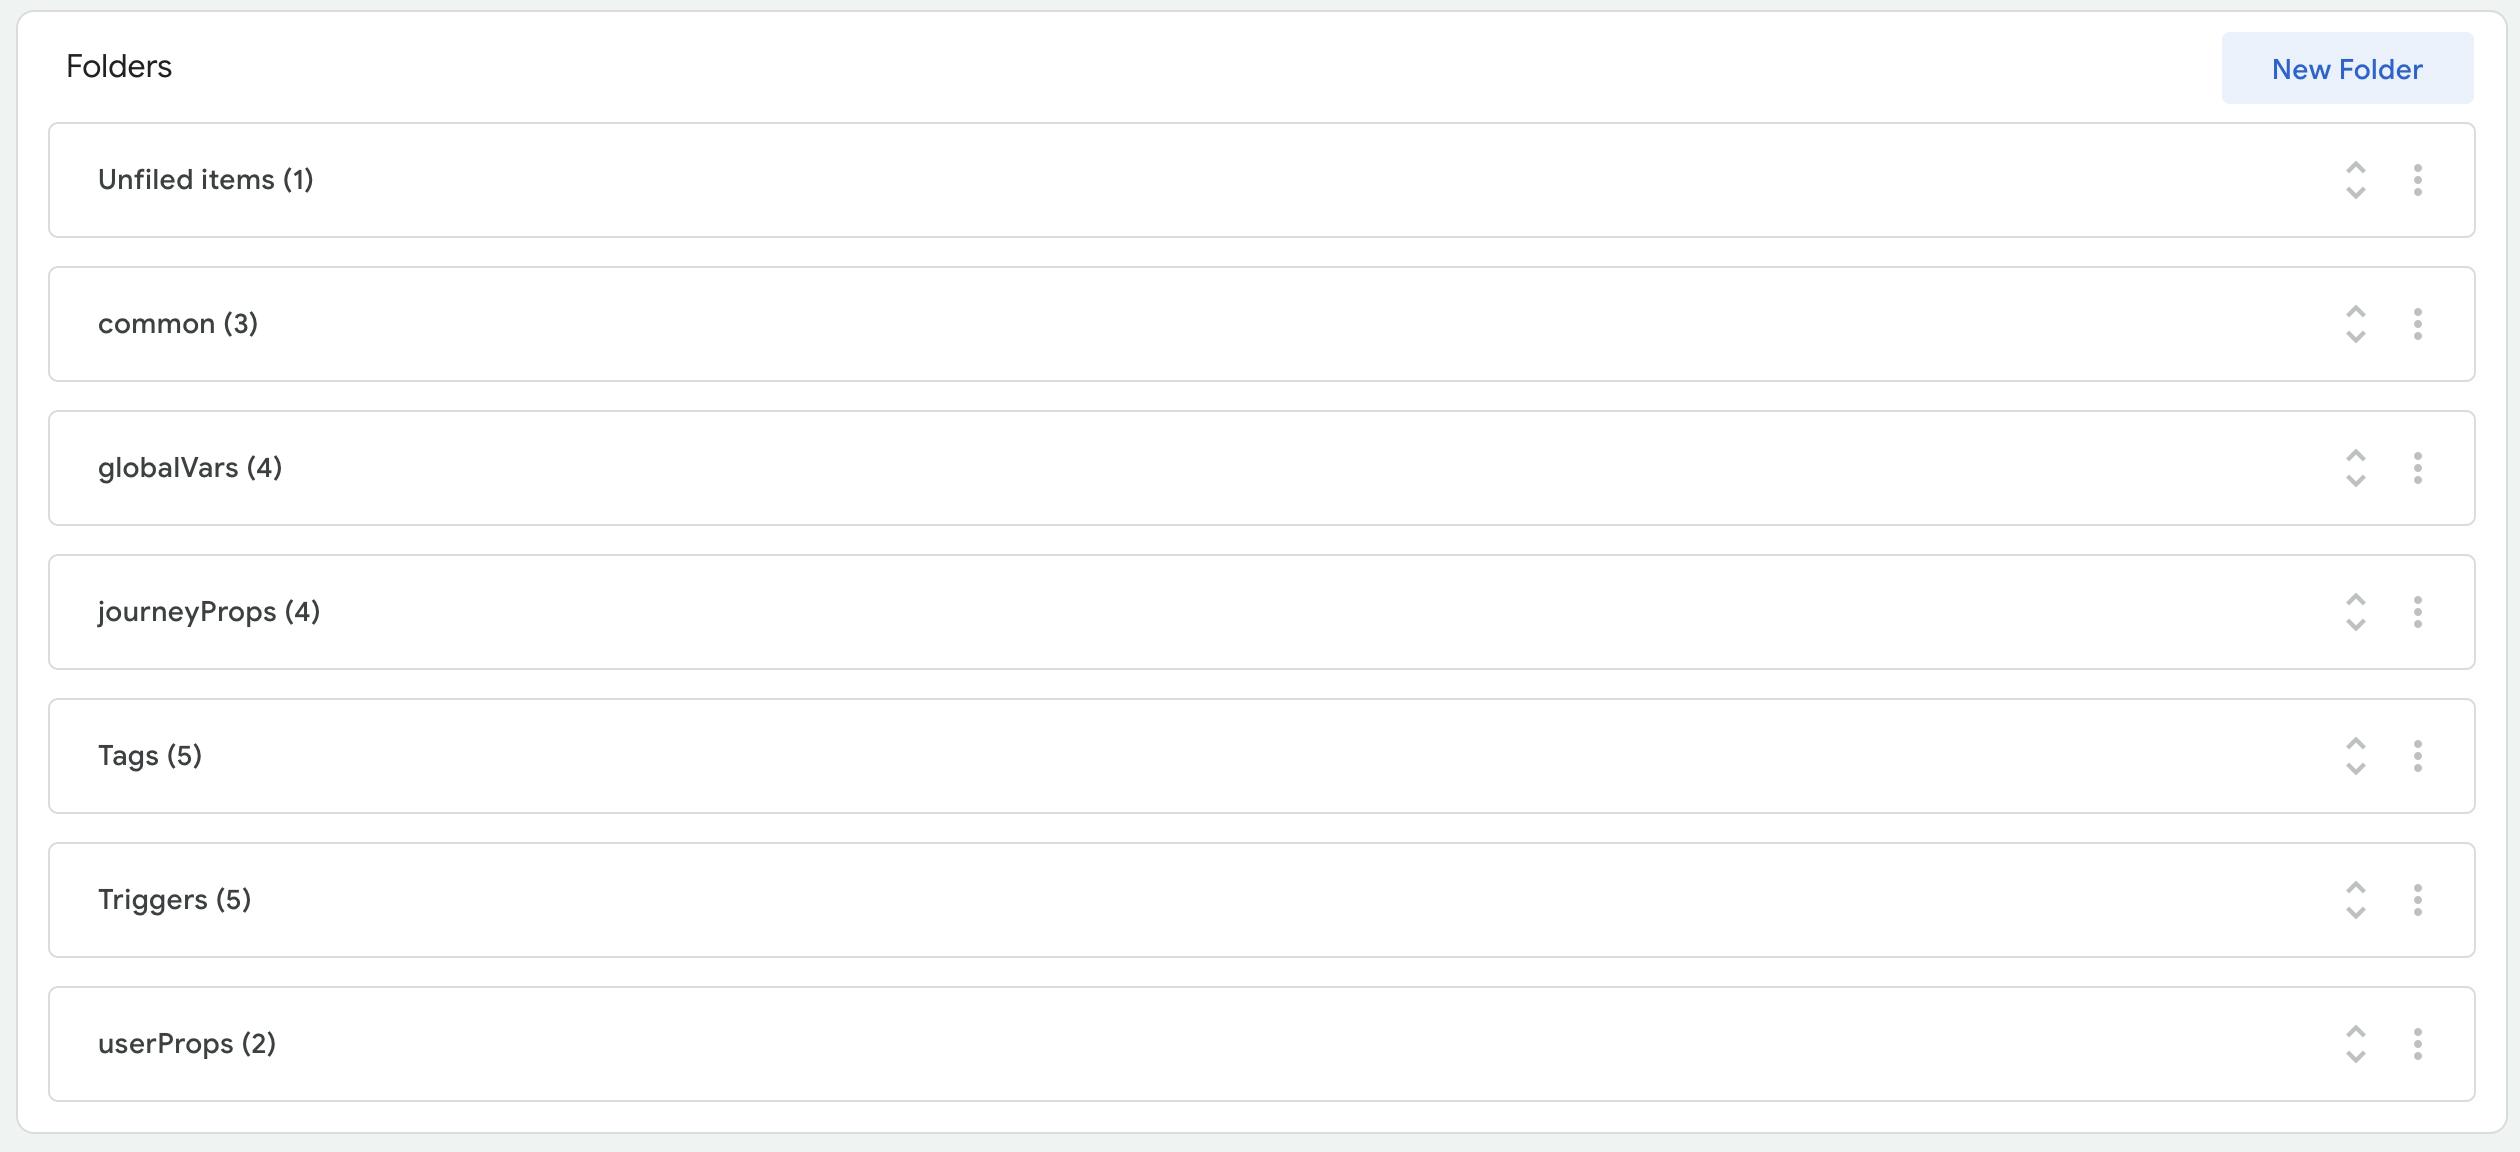
Folders ✅
This is one example of how to organise your variables, you can arrange the folders however you like.
Triggers ✅
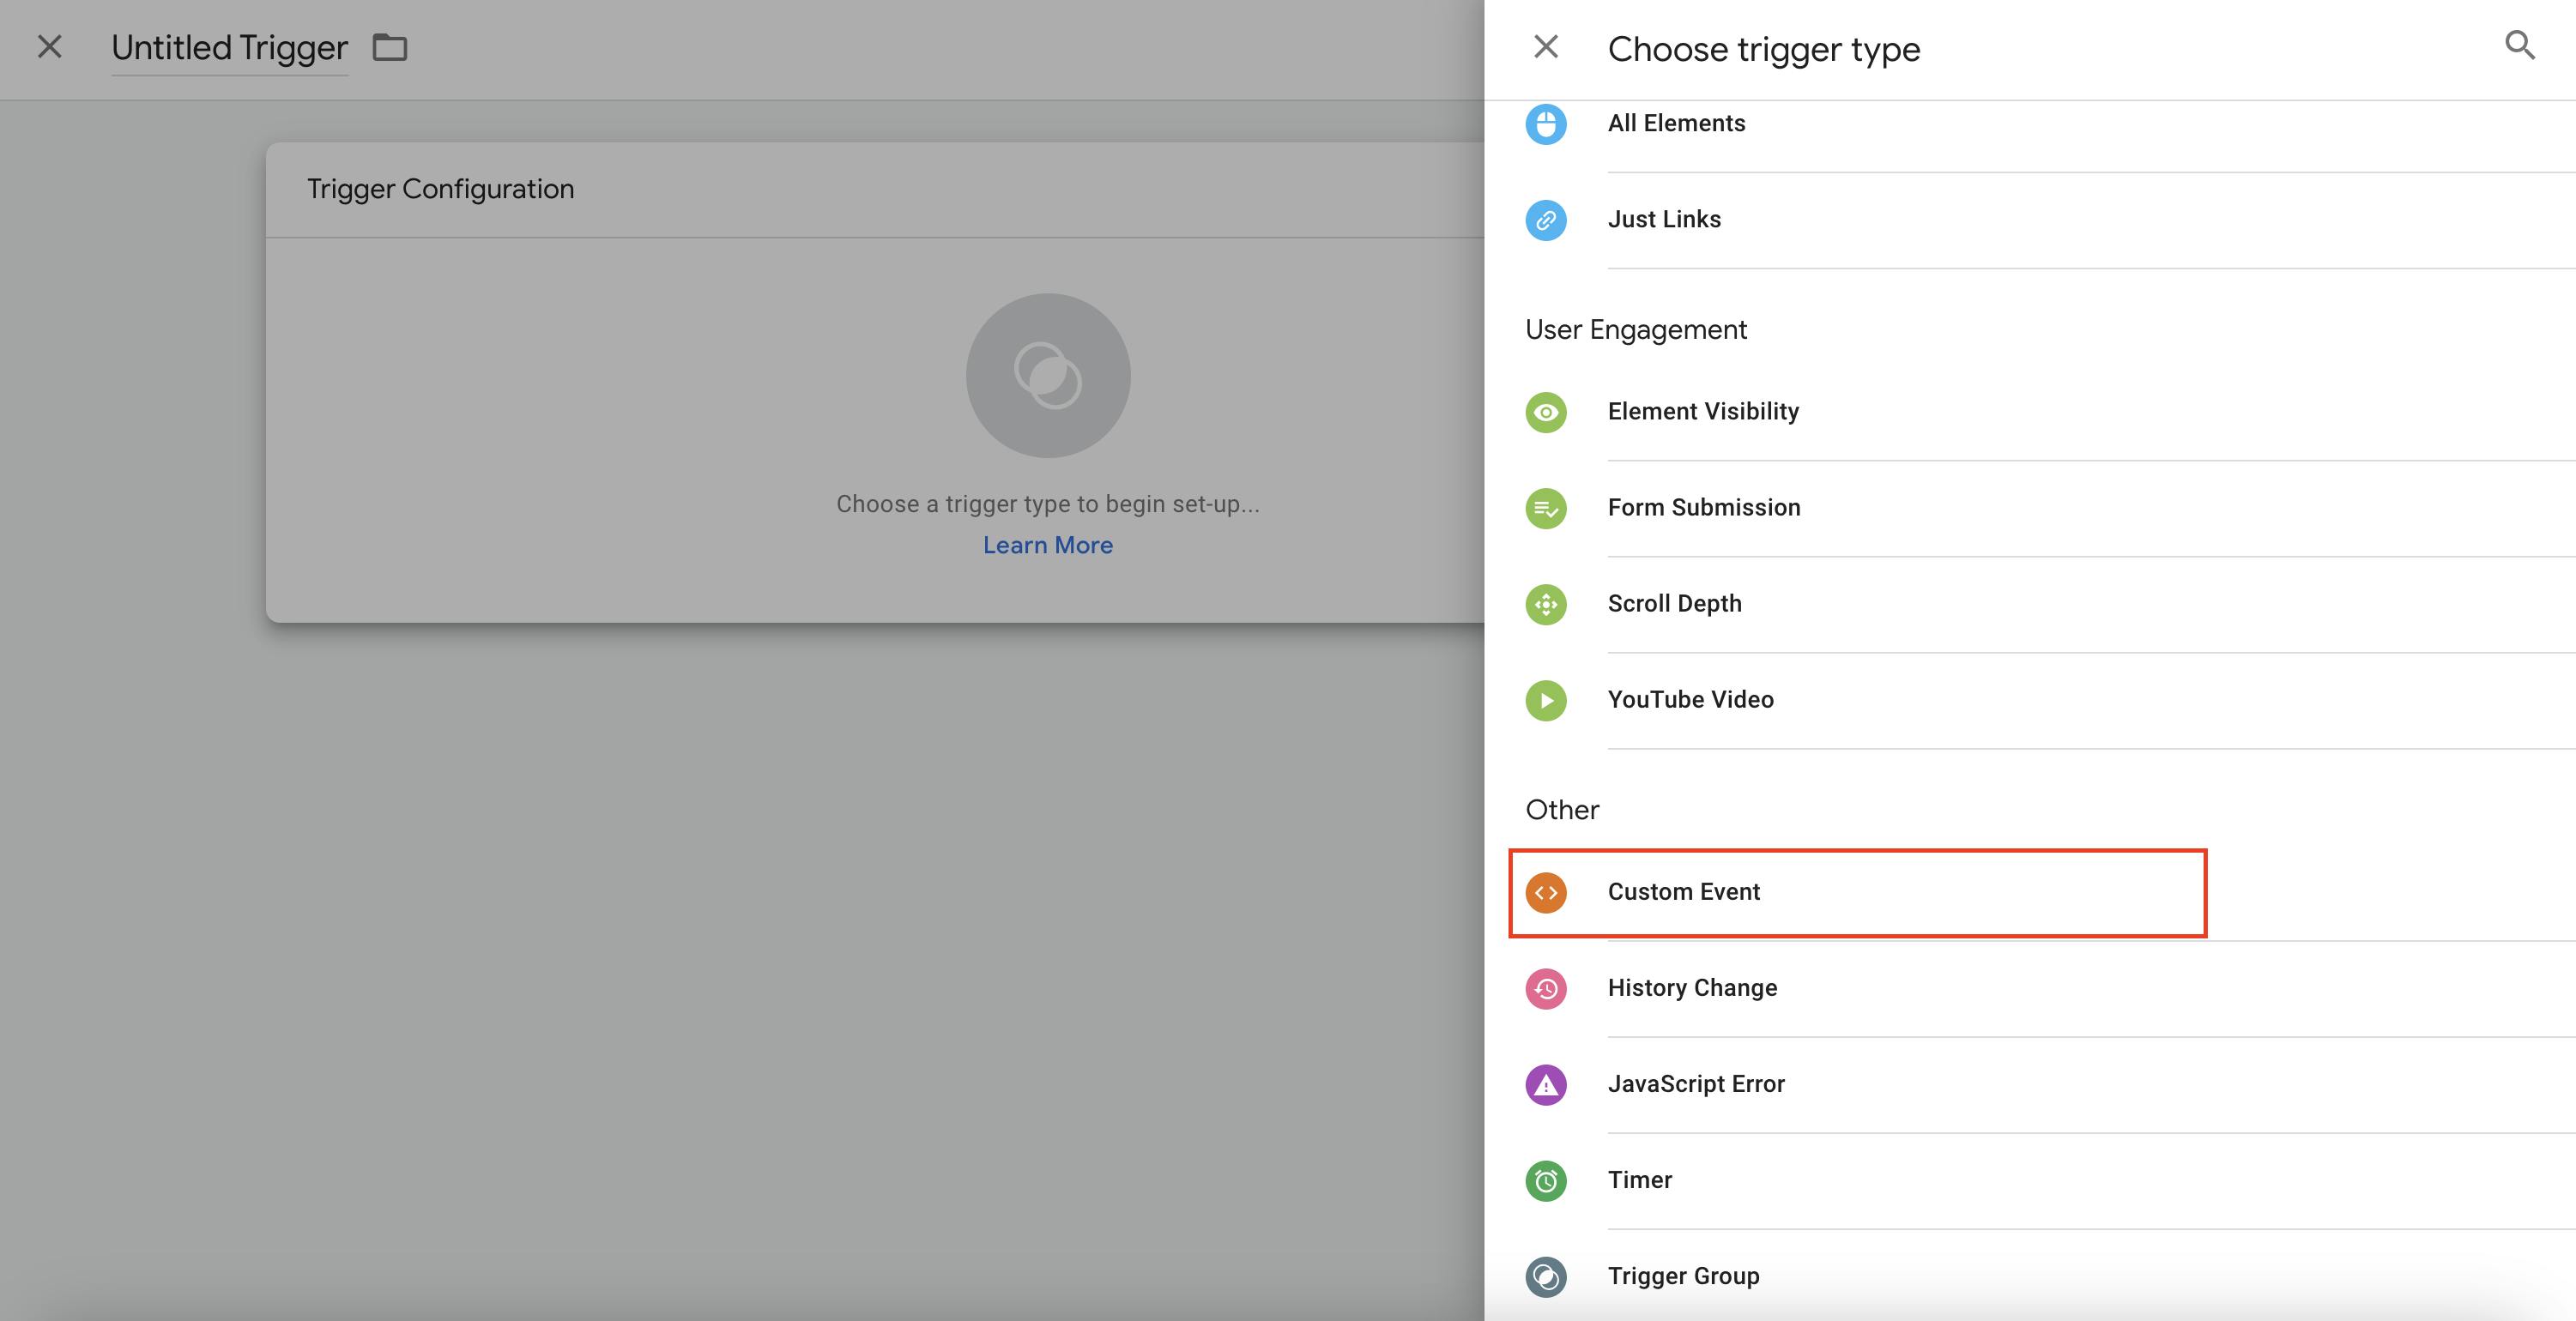
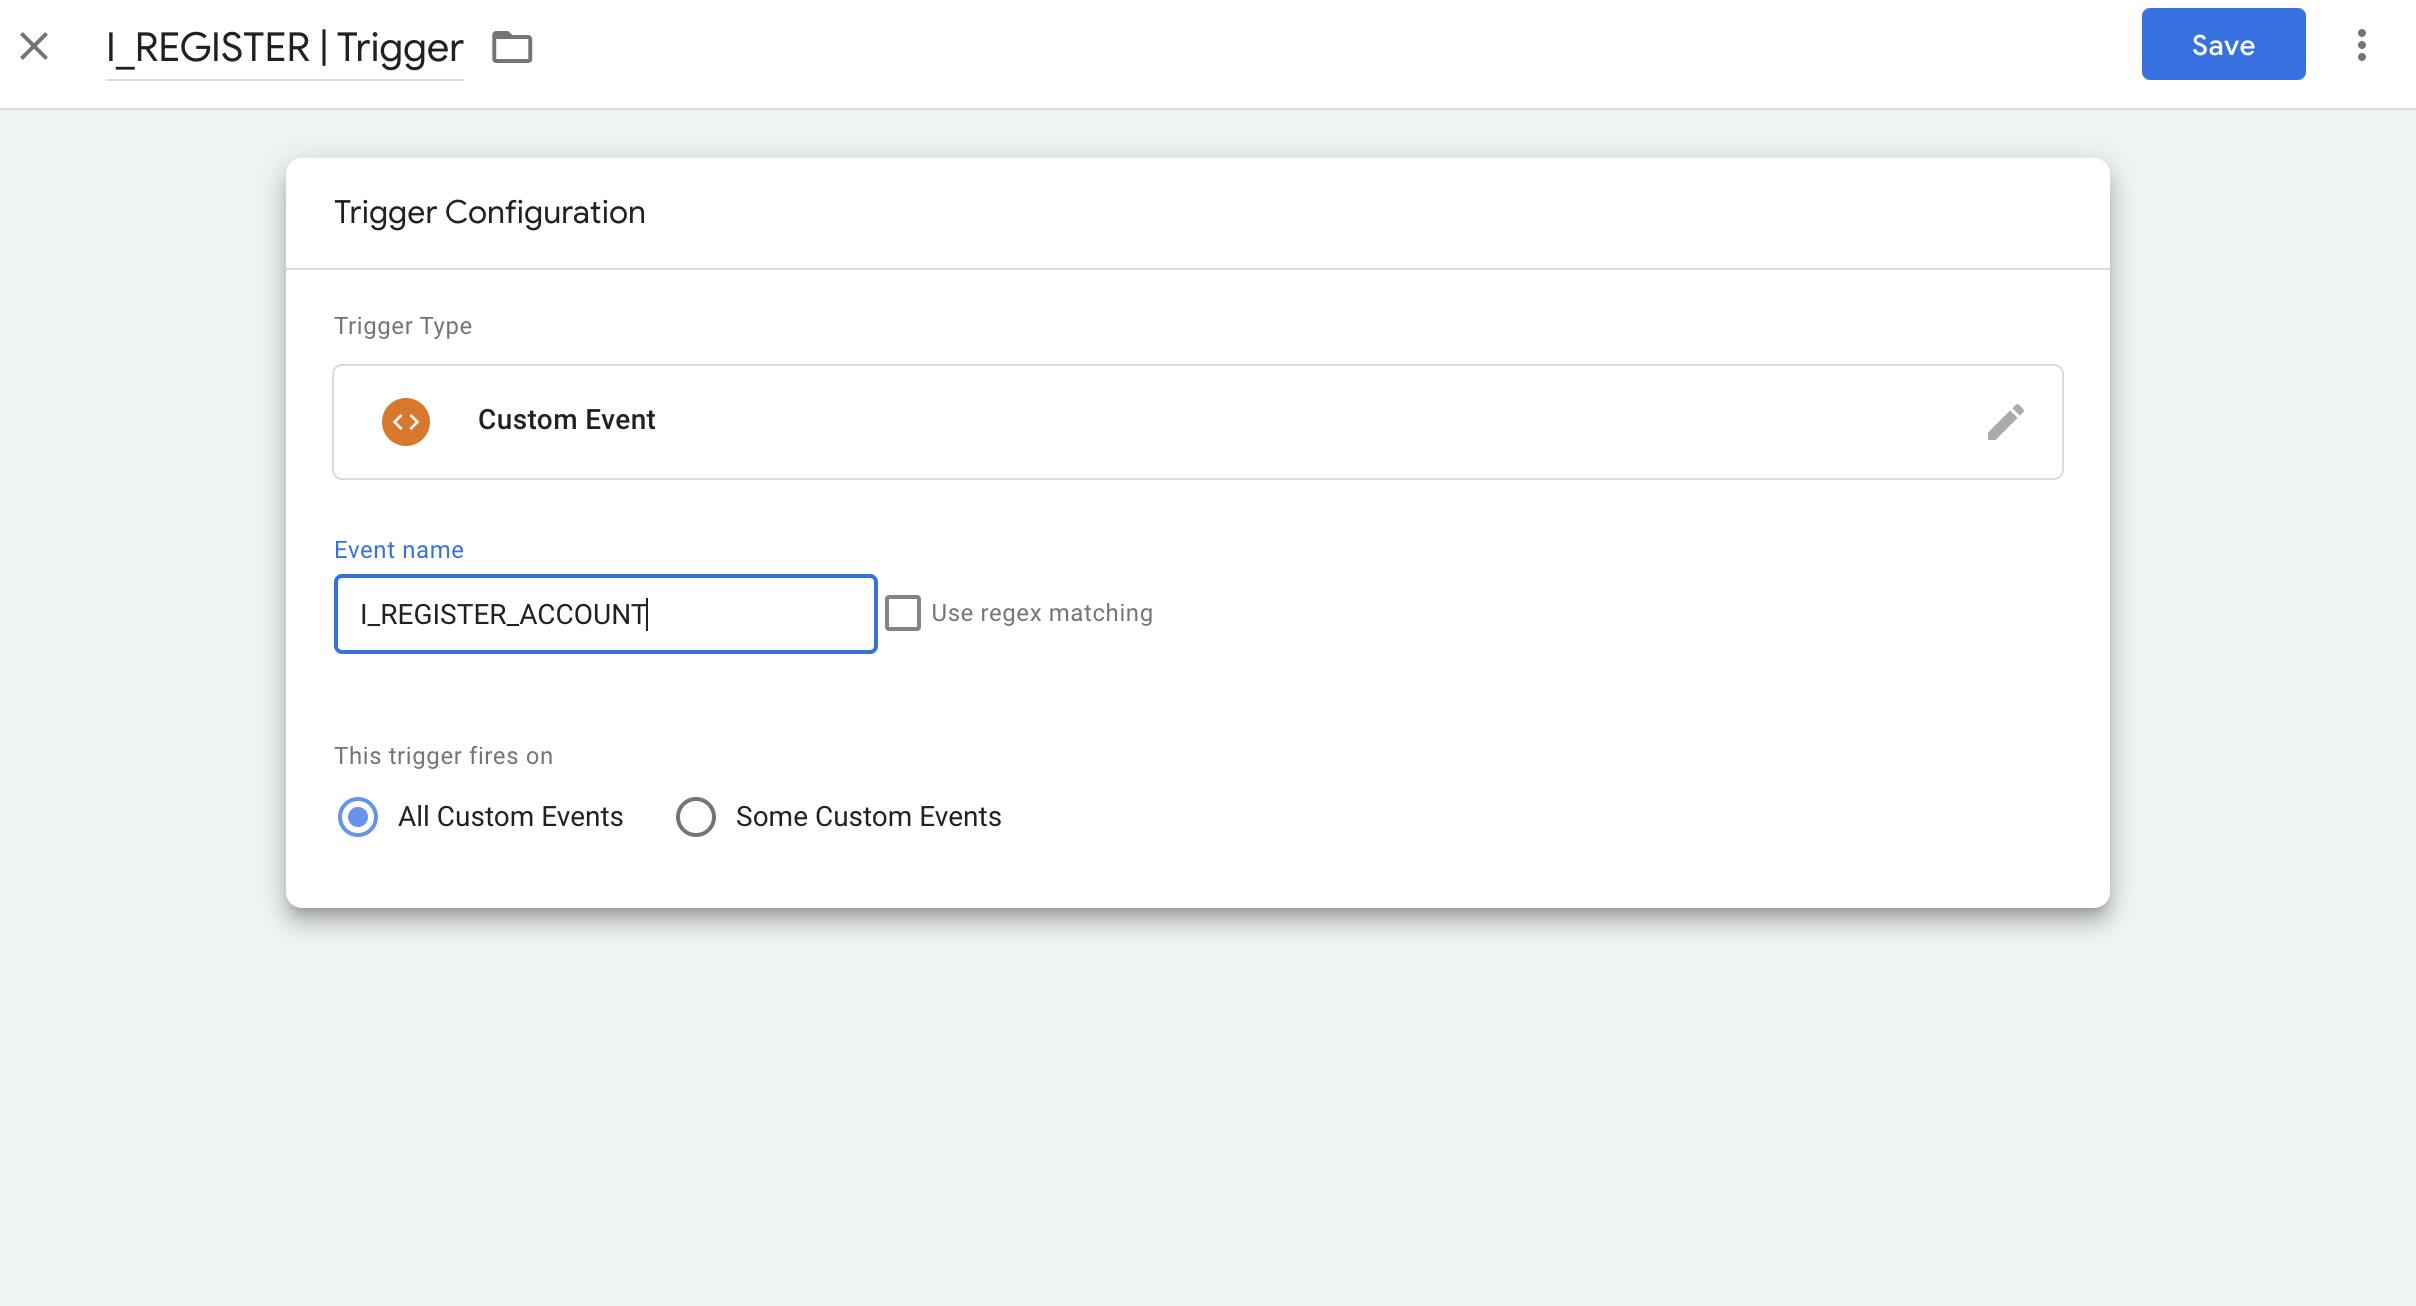
Give your trigger a name and add it to a folder
Add the Event Name, the Trigger event name must match the name you add to the
dataLayer. The event name can also use regex which can be useful for event names that have a key/s to match on.
I will not cover regex this time. A quick simple example in this case could beI_*_ACCOUNTthe*will Trigger bothREGISTER&LOGIN.That is it for Triggers.
Tags ✅
This is where it all comes together! Tags house your variables and triggers consolidating the event and data that is sent to Google Analytics.

Here the Parameter Name is what we will see in Google Analytics 4, and the value is the variable reassignment as seen above in the "Variables ✅" section.
This is where we decide what data should be assigned to what trigger/events.
If we want GTM can act as a filter, this means what is sent to GTM from React Marketing Tools does not always have to be sent through to GA4.
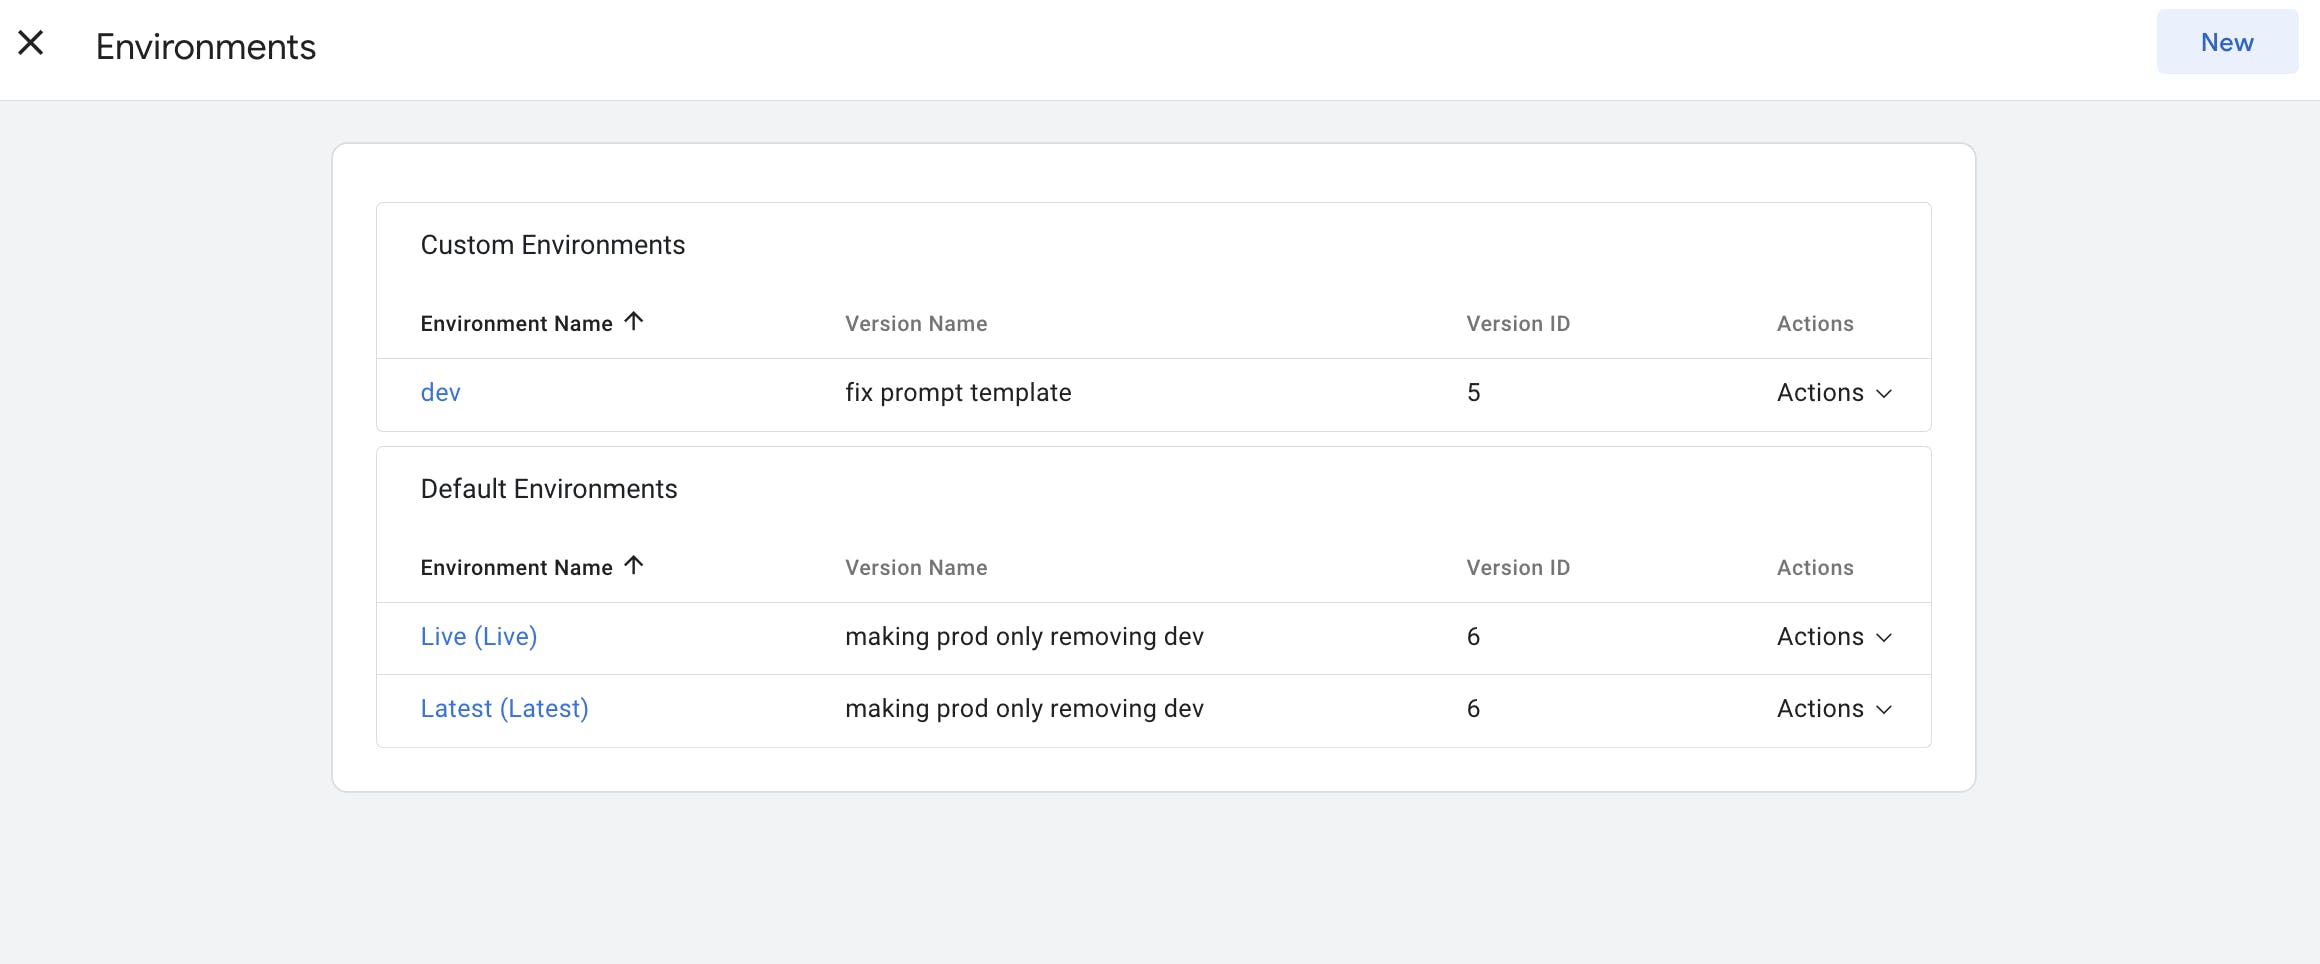
Versions ✅
The version is very important because we don't want to mix dev data with production data. You will get one environment setup automatically env-1.
To add a new env we need to go to Admin > Environments and then click the button in the top right "New".
Give the env a name. Optionally add a description
Enable debugging
Add a destination URL; we will add a
devenvironment, so you can add something likehttp://localhost:3000
Workspace ✅
Here is where we can check our setup before publishing to the respective environments.
NOTE: "Publish to Environment", initially I will publish to production env-1 and then make a trivial change to republish to my development environment env-3.
That is it!
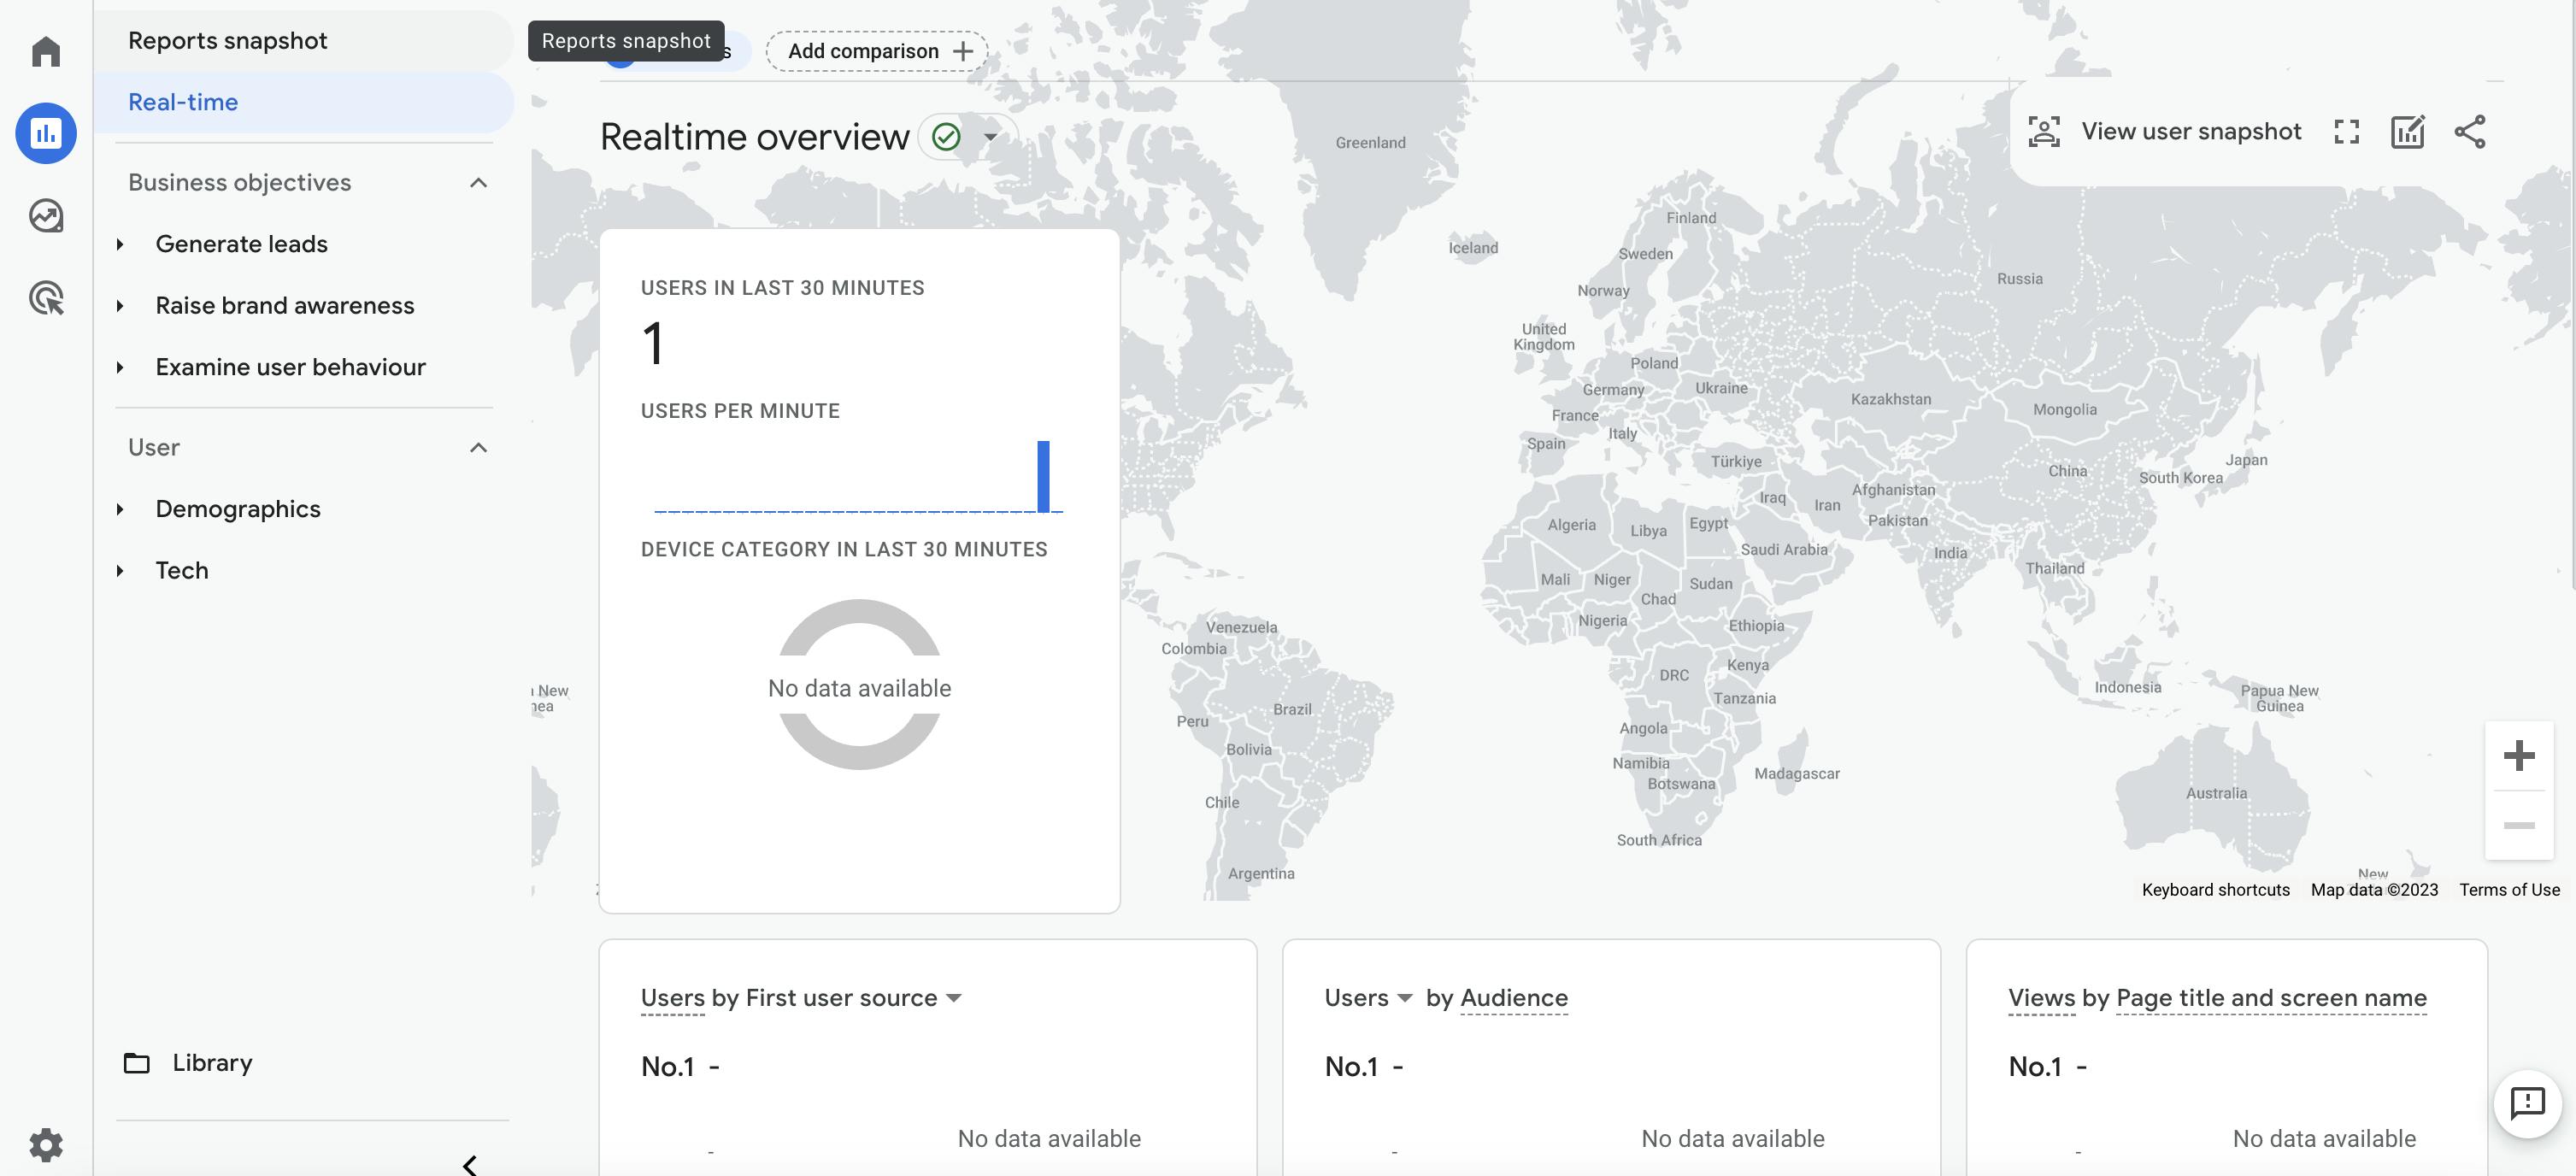
We have now passed data from our App, through to Google Tag Manager, then on to Google Analytics 4. From here I will leave it to you.
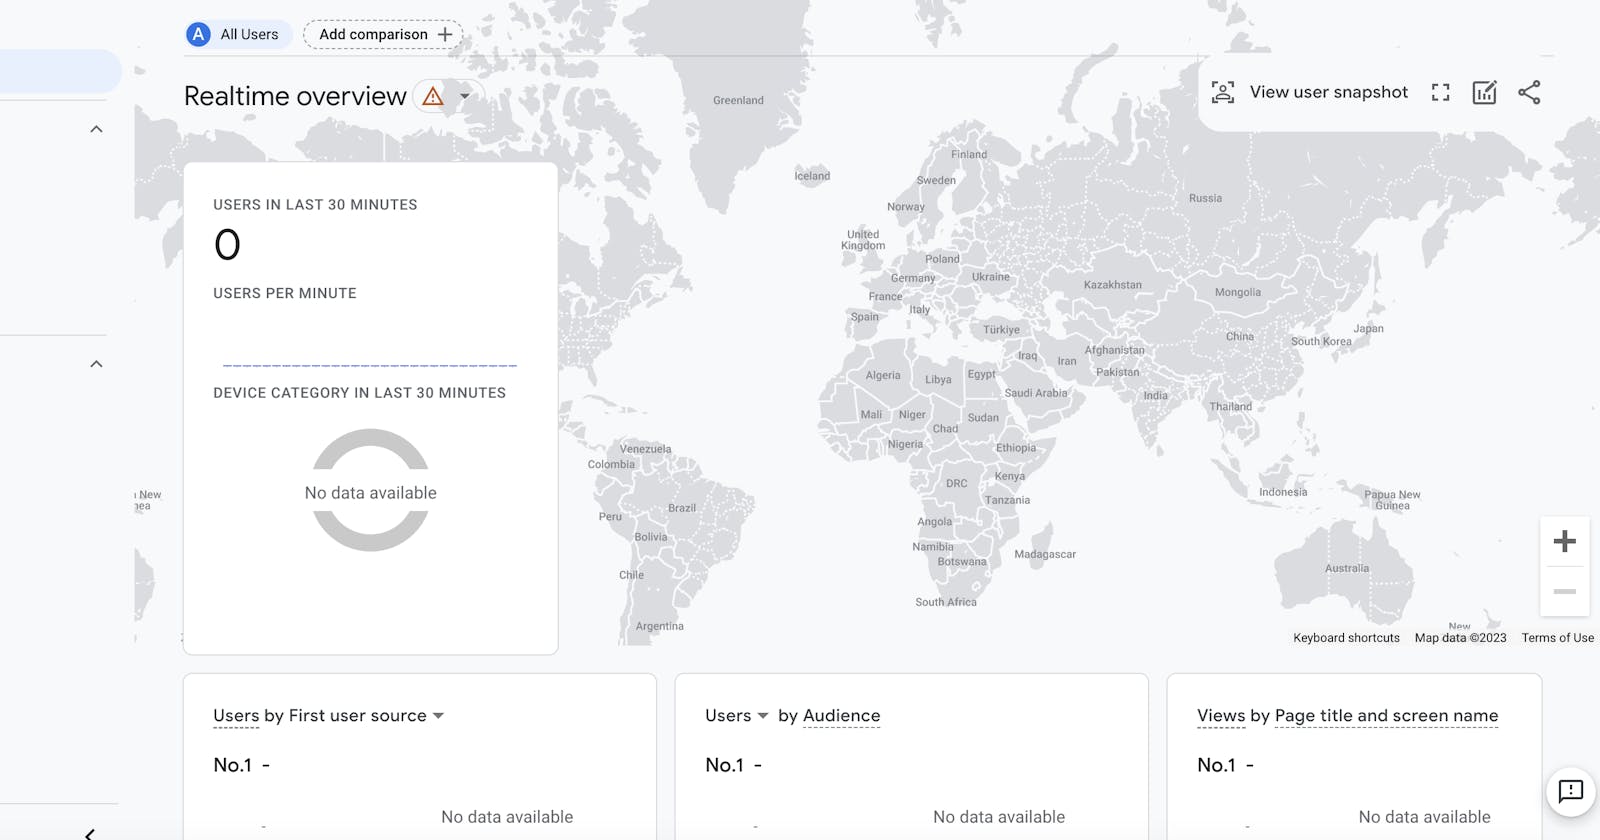
If you want to check the data is arriving go to your production site open GA4 and go to Reports > Real Time. You should see 1 or more visitors and here you can inspect the events, variables and data that arrive.
Thanks for reading, if you have any questions or comments, please leave them below. ✌️